Sunday 5 May 2013

girl-6

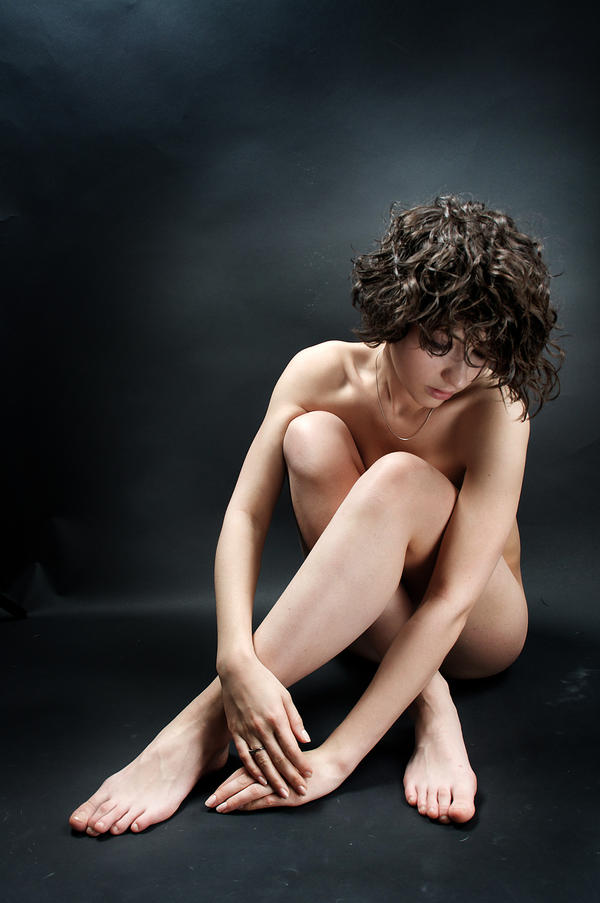
You may remember that I found some interesting pictures on the CG Artists forum. One of the was called a painting by Edward McEvenue based a photo called girl-6 by buzillo.


I had a go at printing a model of her in the grey ABS which I had been using recently but was disappointed to see that the print was badly split in several places.


I have been reading about some people who have been experimenting with printing in a new nylon material called Taulman 618. One of the claimed advantages is its superior layer bonding with greater resistance to delaminating. I thought I would give it a try.


So, what are my first impressions of printing with nylon?
Positives:

  • No odour
  • Sticks well to blue painter's tape even on a cold bed
  • Nice smooth surface with a lovely sheen
  • No delamination at all
  • Much more flexible (less risk of breaking)

Negatives:

  • Support material is harder to remove
  • Strings are tricky to remove
  • No way of smoothing the surface yet
  • Much more flexible (less statue like, more bendy toy)

Will I be using it again?
Definitely!


Bridge printed

My test print of Bridge was successful at first sight, but on closer inspection the leotard had been only partially printed, particularly across the back where it was rather messy. In other places, it was a completely separate and rather fragile layer which started to come away as I removed the support material. So, in summary, my first faltering steps with printing clothing had been a bit of a failure. I decided to try and recover an otherwise good print by breaking away the remnants of the leotard.
A bit of scraping with a knife and an acetone vapour bath later, and I had another nice looking model.


Before removal of support material and leotard fragments


Friday 26 April 2013

On show in London

If you are lucky enough to be able to attend the opening of the new iMakr 3D Printer Store in London  on 30th April keep an eye out for these two pieces which are currently on loan and should be on display. Let me know what you think if you see them there.


Oh, and look out for me as well. I'm planning to be there too!

Check out this video of the iMakr shop. You can see these two sculptures in the background at 1:30.
http://www.bbc.co.uk/news/technology-23499822 

Monday 22 April 2013

Bridge

I've been seeking inspiration for my next prints. Pinterest has some interesting collections of artistic nude photos (although it claims that it doesn't allow them) and I'm sure I will choose one of theirs soon. However, another great resource is DeviantArt, a site I have followed on and off for some years. It was there that I found a great shot by TarMoo called Art Nude Symmetry.


It's quite a striking photo which inspired me to try and reproduce the pose which I have decided to call 'Bridge'.

With its minimal points of contact and absolute requirement for support material, it was clear that I would need to start with a raft and, ideally, print in ABS. Whilst photos can only be seen from the specific angle selected by the photographer, sculptures can be viewed from any angle chosen by the viewer. Unusually for me, I decided that this particular model deserved a leotard to protect her modesty. I'll see how the print turns out and decide whether to do a fully nude version later.
The model in this photo has her hair in a simple bun which works well for this image. I tried making a bun but I didn't like the look of it. I also tried short and long hair styles but they didn't really work with this heads-down position. At the moment the model doesn't have hair but, again, I may decide to review this after the first test print.

Saturday 30 March 2013

Curl

I decided to have a go at reproducing the pose in Jian Xu's picture shown at the bottom of my last post. Tricky parts included getting the fingers into the correct position, particularly since it seemed to push the right elbow into odd places, and dealing with the deep mesh overlap where calves met thighs and thighs met trunk.

I'm still struggling to get good quality solid hair and I don't always like the models looking bald! This time I used Sculptris to fashion a short hair style starting from a simple sphere. It's not great but it kind of works.

Here is the cleaned up version in Blender beside the reference picture.


Metamorphosis looked beautiful in the translucent blue but, being made of PLA, I couldn't use the acetone vapor bath to smooth the surface. PLA isn't soluble in acetone. I knew that I wanted to have a smooth surface on Curl, so I thought I would try printing a copy in black ABS.

My first attempt was sliced in Slic3r 0.98 but again I was disappointed with the way it generates support structures, so I abandoned that print and sliced again in Kisslicer. This version looked much more promising and I have learned that the initial raft is an indispensable feature for supporting this type of model.

Here is the model on the print bed and in close up, showing the support structures (under LED lighting).


Here is the bottom section of the support material after it was peeled away from the model. I am still impressed with how well the support separates from the model given that they are both made of the same material.


And here is the final version after processing in acetone vapor.


Friday 29 March 2013

Computer Graphics Society

My latest search for ideas for a new sculpture led me to the CG Society website where I found some great art.
The first picture I found was by Edward McEvenue and looks like a 3D rendering but, as the artist's own website reveals, it is actually a painting derived from an original image here.


The second picture by Jian Xu was modelled in 3DSMax and once again I liked the unusual position of the limbs and the head presenting some beautiful curves which should prove quite challenging to reproduce.


Sunday 17 March 2013

Metamorphosis


This weekend I created a new sculpture based on the photo of Edward Watson performing in Kafka's The Metamorphosis. I tried to reproduce the pose as accurately as possible and was very pleased with the result.

 I had hoped to print the sculpture without turning on the automatic support feature in the slicing software, but as soon as I had finished posing the model it was clear that this would not be possible. As well as the shallow slopes on the thigh and arm, there were points, on the tip of the chin and the underside of the breasts, that had nothing beneath them. 

I used Kisslicer to turn the STL model into printer instructions and enabled medium support. This time I decided to try printing at 150 micron resolution to reduce the visibility of the layers. I also wanted to find out how well the support material could be removed from a PLA print so I used a translucent blue filament for the 12 hour print.


The support material was more difficult to remove from PLA than with the grey ABS, but after a bit of work it came away surprisingly cleanly.
Here is a quick video of the model on a turntable to show it from all angles.


And here are a few photos.