Showing posts with label ABS. Show all posts

Monday 5 May 2014

Loopback

Another new pose inspired by this photo I found on Pinterest. The original photograph was taken by Mikhail Nekrasov.
(UPDATE - see Mikhail's comment below)


Character posing software really seems to struggle with extreme shoulder positions and this one was no exception.

I wanted to use Simplify3D again to make use of the excellent support material it generates. However, importing the finished model processed in Blender seemed to show artefacts generated by the eyes and mouth. Cura's Fix Horrible option still does a better job than Simplify 3D in this regard but unfortunately there is no function to export a 'fixed' file.

My standard solution in the past would have been to use Project Miller, the great experimental tool from Autodesk Labs, but it expired and ceased to work on 1st April 2014. Not funny!

Just on the off-chance, I reset my PC's clock to Feb 2014 and started the program up again. Bingo! It works perfectly. I fixed the model, exported a new STL file and loaded it up into Simplify3D. The new gcode looks clean as a whistle. Ready to start printing.

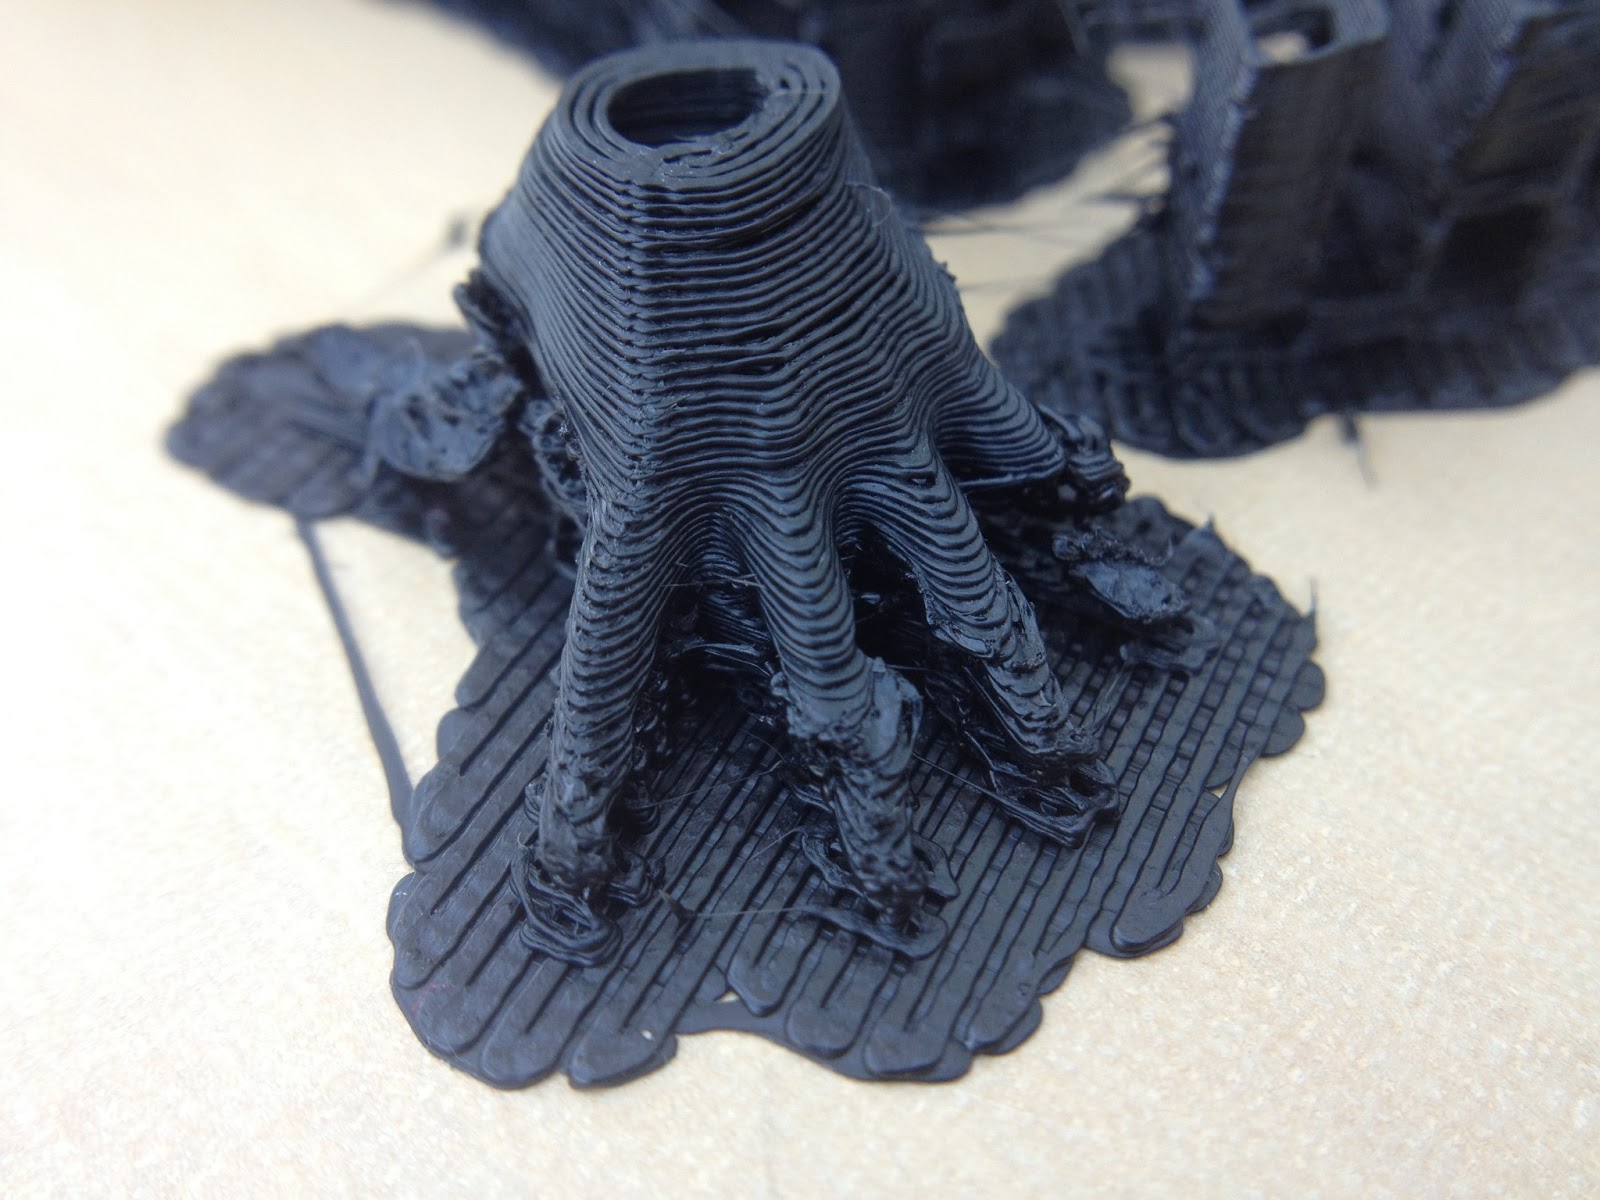
After a 12 hour printing run the print quality is already looking great.


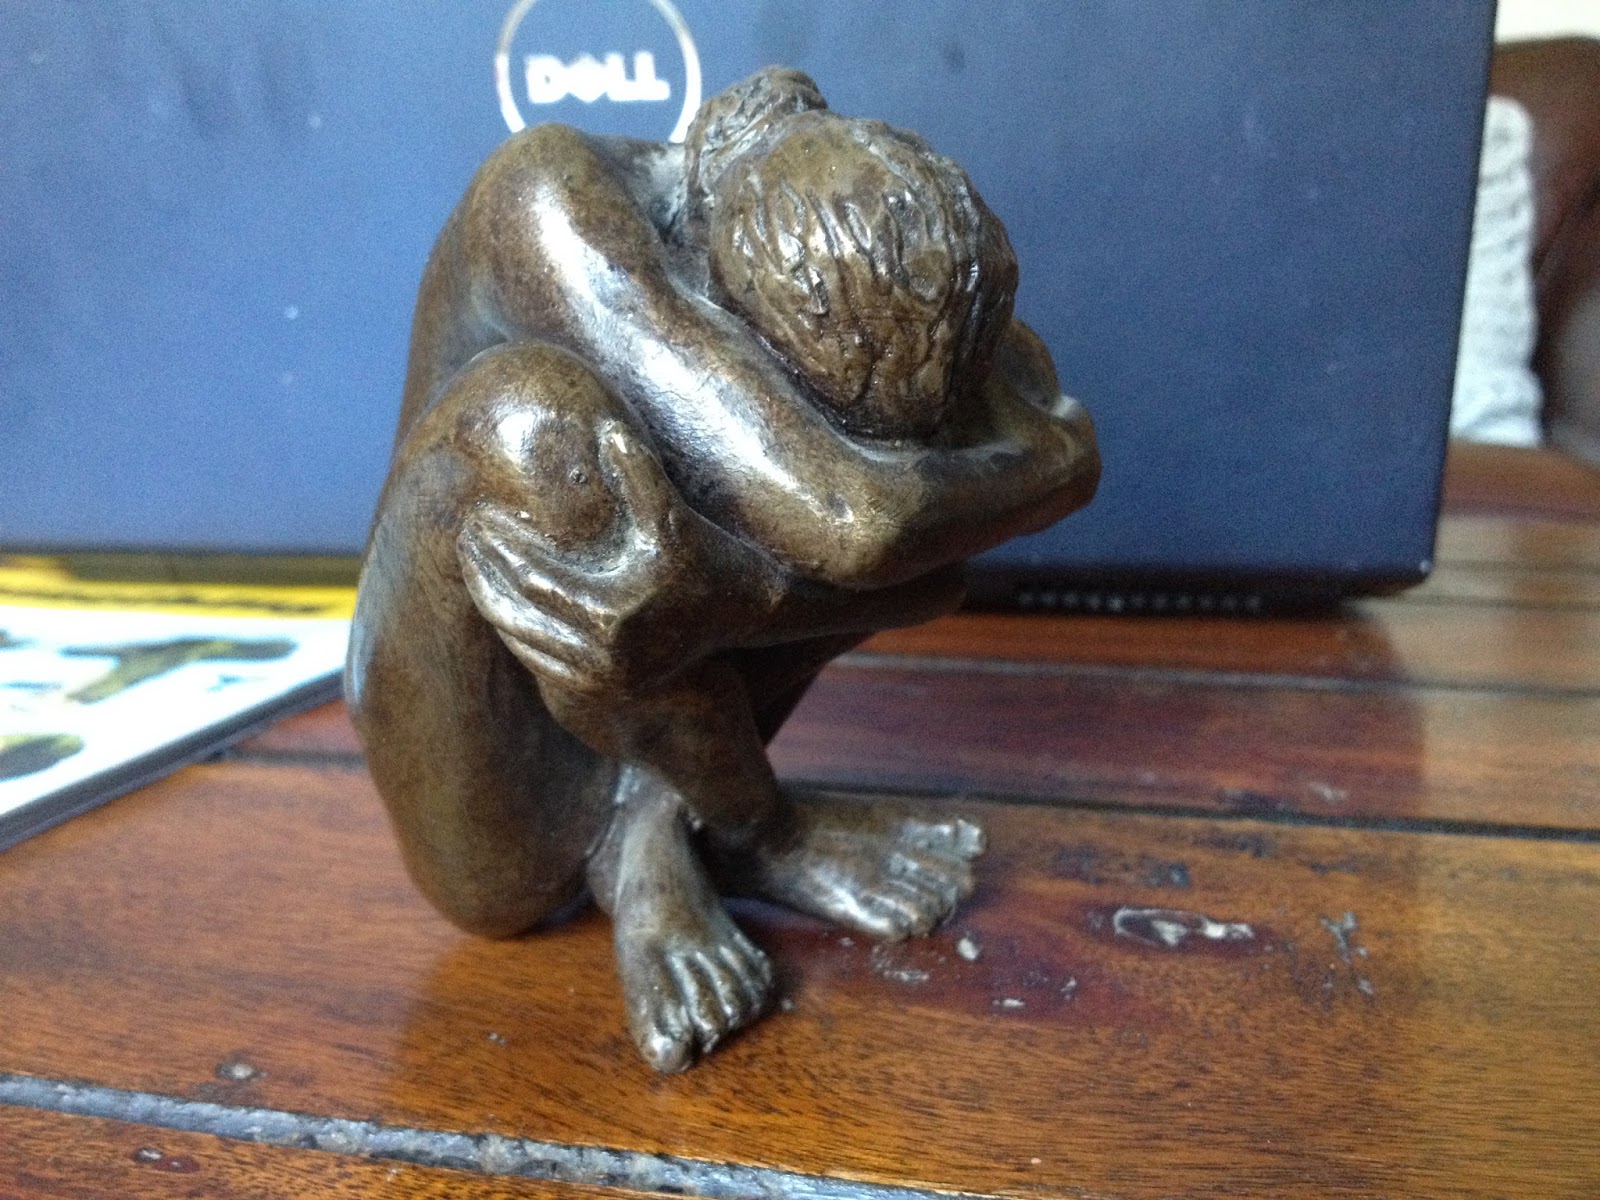
This black ABS plastic always looks nice after smoothing with acetone vapour. Some of the horizontal banding caused by the print layers can become a bit more prominent though, so after breaking away all the support material I decided to try something new and gave the whole model a light sanding with a fine grit sandpaper first.


For models like this, I recommend doing the acetone vapour treatment in two halves. Holding the upper half of the model, I gently lowered the legs into the vapour for about 20 seconds and then set it aside to harden on a ceramic tile. Once the surface was hard to the touch several minutes later, I held the model upside down in the vapour and treated the head and body the same way.
This method gives a nice even smoothing without risking melting the lowest parts into a puddle of sludge.


And here's the original again.  How did I do?


Wednesday 23 April 2014

Photo finish

Here are some photos of the prints from 'Casual undress' and 'Crouch' after finishing with the acetone vapour smoothing process.


Monday 21 April 2014

Casual undress

Right, I think it's time for an Entiresia original.

I have a pose in mind and I'm going to have a go at creating it from scratch. I want the woman to be relaxing casually on her side, head propped up on one arm with the other hand reaching forwards and resting on the floor. I also want the knees tucked up a bit and both feet resting on the floor.

I started by positioning the right arm and then the head and neck. Next, I added a bit of forward bend, lateral flexion and slight rotation of the spine, to make the right hand side form a straight line, as if lying on the floor. The model was then rotated almost 90 degrees to the right, into the reclining position. The breasts were repositioned slightly to show the effect of gravity pulling from the right side and then the legs and the left arm were placed in contact with the floor.


This pose was also designed with 3D printability in mind, so should require a minimum amount of support.

I did the slicing in Cura with my usual setting of 0.15 mm layer height and 25 mm/s print speed, although I think I could have gone a bit faster. The steep angle on the left forearm caused a bit of curling of the leading edge so I had to use a small amount of cooling fan (sometimes it helps, even with ABS) to prevent the nozzle from crashing into it. I took the temperature up to 240C this time and was very pleased to discover that this print has absolutely no sign of splitting anywhere.


After a bit of sanding to clean up the support marks I took this series of photos, making the most of the low morning sun - vapour smoothing to follow soon, I hope.


Sunday 20 April 2014

Crouch

I have a good friend who we visited recently, who has many fine pictures and sculptures in her house, many of them art nudes. One small sculpture on her mantelpiece caught my eye as it looked both original and printable.


Here is the STL file, processed in the usual way, ready for printing.


I used Cura for the slicing, both for its support and ability to fix overlapping meshes (Project Miller has now ceased to function!)
I decided to print in black ABS and use vapour smoothing on the finished print. This version was printed inside the heated chamber at a slow 25 mm/s and 235C. 
There is one small split across the back which I hope will improve with acetone treatment.

Before support removal


After support removal


I have another project in the pipeline (well, in the printer actually), so I'll wait until that's finished and then start a smoothing session on both of them.


Monday 13 January 2014

Cicero D'Avila

I have continued in my efforts to make a good print of the sculpture inspired by the Cicero D'Avila pose in my previous post.


Firstly, I remade the arm pose, tipping the woman's head back to improve the angle of the face and prevent the arm support material from falling across it.


This smaller version was printed on a delta printer in red PLA and showed that the model was printable although the underside of the arms is still very ragged following removal of the support material.

At this point I decided to change the arm position again, opting for a more vertical configuration that would hopefully avoid the need for any support material. 


Once again I decided to shortcut the process of making the model printable by using Project Miller to re-skin the mesh. Unfortunately, the model still had some errors which resulted in malformed Gcode when I tried to slice it with Slic3r and Kisslicer. This time I found that the new version of Cura (I'm using 13.12) offered some very useful advanced options including Combine Everything (Type B) under the Expert settings. The Gcode looked very good in Repetier Host so I set off the 12 hour print and this time I finally managed to produce a model that does justice to the sculpture I had planned.

Here's a timelapse video made inside the printer using Octoprint.


Some detail shots taken before the smoothing process.


And after smoothing in acetone vapour to remove the print lines and support blemishes.


One more video of the finished product.


Tuesday 18 June 2013

Body Language

I have just completed one of my best projects so far. It was inspired by another great Bruno Birkhofer photo called Body Language.


I took special care with the pose modelling to capture the lines as faithfully as possible, carefully placing the limbs as close as possible to each other without overlapping. I reused a short hair style of my own creation.

Here is a screenshot of my version in Blender.


The next important step was deciding how to print it and what kind of support to generate. I used Kisslicer to generate the printer files again, because although a new version of Slic3r has just come out with supposedly much improved support generation, I haven't had time to test it yet.

I decided to to make one change from the settings I used for the previous Birkhofer print and that was so go up from Medium to Dense for the support layer, just to see what would happen.

The other genius idea I had was to turn the print vertically for printing, which changed the position and amount of support material required. If I had printed the model exactly as it appears in the picture above, all of the chest and head would have need support underneath it. By rotating it to a much more vertical angle almost none was needed in these areas.


I was so impressed by the new settings that decided to make another video of the support removal process. You can see how my preferred tool is a flat bladed screwdriver which breaks the weak bonds between model and support with less risk of damage to the delicate areas. The support was certainly more dense than before and, in my  view, held the model better whilst still coming away cleanly.


Support removal video


Before and after smoothing


Finished print


Tuesday 4 June 2013

Recline further

I decided to persevere with Recline and try to fix some of the problems.

Following an invitation from Sublime to try his calculator (see the comments in Recline), I learned that my setup could work better at 0.2 mm layer height if I increased the extrusion width from 0.4 to 0.48 mm. That should certainly help to improve layer bonding somewhat.

I also reasoned that the delamination in the first print had been caused by excessive part cooling with the fan. I know, I know. ABS isn't supposed to need a cooling fan but I still believe that with steep overhangs it just prints a bit better with one; I just had it turned up a bit too high.
The next problem to work on was the fingers. I started another couple of prints and both times the fingers failed again. Something different was going on here.


I thought about this for a long time and eventually came up with three ideas for possible solutions.
Firstly, the way that I had splayed the fingers out made the overhang angle more than 45 degrees. Changing the pose slightly to make the fingers more vertical should help.
Secondly, I had changed the support gap setting in Kisslicer from 0.5 mm to 1 mm to try and make it easier to break away; I suspected that this was actually making the support less supportive, so I put it back to 0.5 mm.

Finally, it dawned on me that the only thing supporting the fingers was the weak interface layer attaching them to the raft. This hadn't been a problem with Curl because there were relatively large areas attached to the raft but this print was quite literally clinging on by its fingertips, and in the end the lateral drag of hot plastic from the rapidly moving nozzle was proving too great for the weak bonds. The solution for this print was to abandon the raft and find a better way to get the fingertips to stick to the bed. 

One option I considered was to print the model on a plinth. This would provide the strongest and most reliable base but wasn't really in keeping with the rest of the series so I decided to keep it in reserve. 
Eventually I resorted to my favourite method which has worked well in the past. I went back into Blender, opened the model in point edit mode and used 'Box select' to highlight all the points in the bottom millimeter of the model and then used Scale Z 0 (zero) to flatten the bottom of the model and finally moved all the selected points up a little to the most natural position.
A liberal splash of ABS juice on the printbed and I was ready to have another go.

This time it went much better. No serious delamination at all and the fingers are looking much more solid. The left thumb appears to have shifted and reconnected at the base, but this should be relatively easy to repair.


Now I just need some time to do the support removal and acetone vapour bath.