Showing posts with label nude. Show all posts

Saturday 29 March 2014

Contact

How about this amazing pose in another photo I found on Pinterest
It appears to have come from the Raw Moves collection by photographer, James Houston.

I love the point of contact of the feet, which reminds me of some of the abstract works of Henry Moore or Jean Arp.


I think it will print OK. I'm just not sure how well it would translate into a female pose. 


What do you think?


Well, I had to give it a go, didn't I! As it turned out, getting the pose right was the easy part. I increased the muscle tone a bit and shaped the breasts into a position that suggest they are hanging in the correct direction.
Finding a way to actually print the model proved much more challenging.

Here is a view of the model in MeshLab.


The biggest problem was the contact point of the two big toes - I just knew that the tiny point of contact would be incapable of supporting the weight of the top leg growing upwards above it without breaking. After experimenting with several different ideas and some abortive prints, I decided to cut the model across the middle and print it in two halves. Finding the best place to make the cut took several attempts but the final solution turned out to be the obvious one - cut exactly between the two big toes at the contact point.

Here is the model in Cura, ready for slicing. I used MeshMixer to generate the support structures because it allowed me to place them exactly where I needed them.


And here is the same view in Repetier Host, showing the Gcode file ready for printing.


OK, it's finished! I had to reprint the leg because the toes broke on the first try due to poorly positioned supports. After cleaning them up in Blender I had another go and it came out much better.
I printed in PLA and after cleaning up the support material I used superglue to join the two halves together.

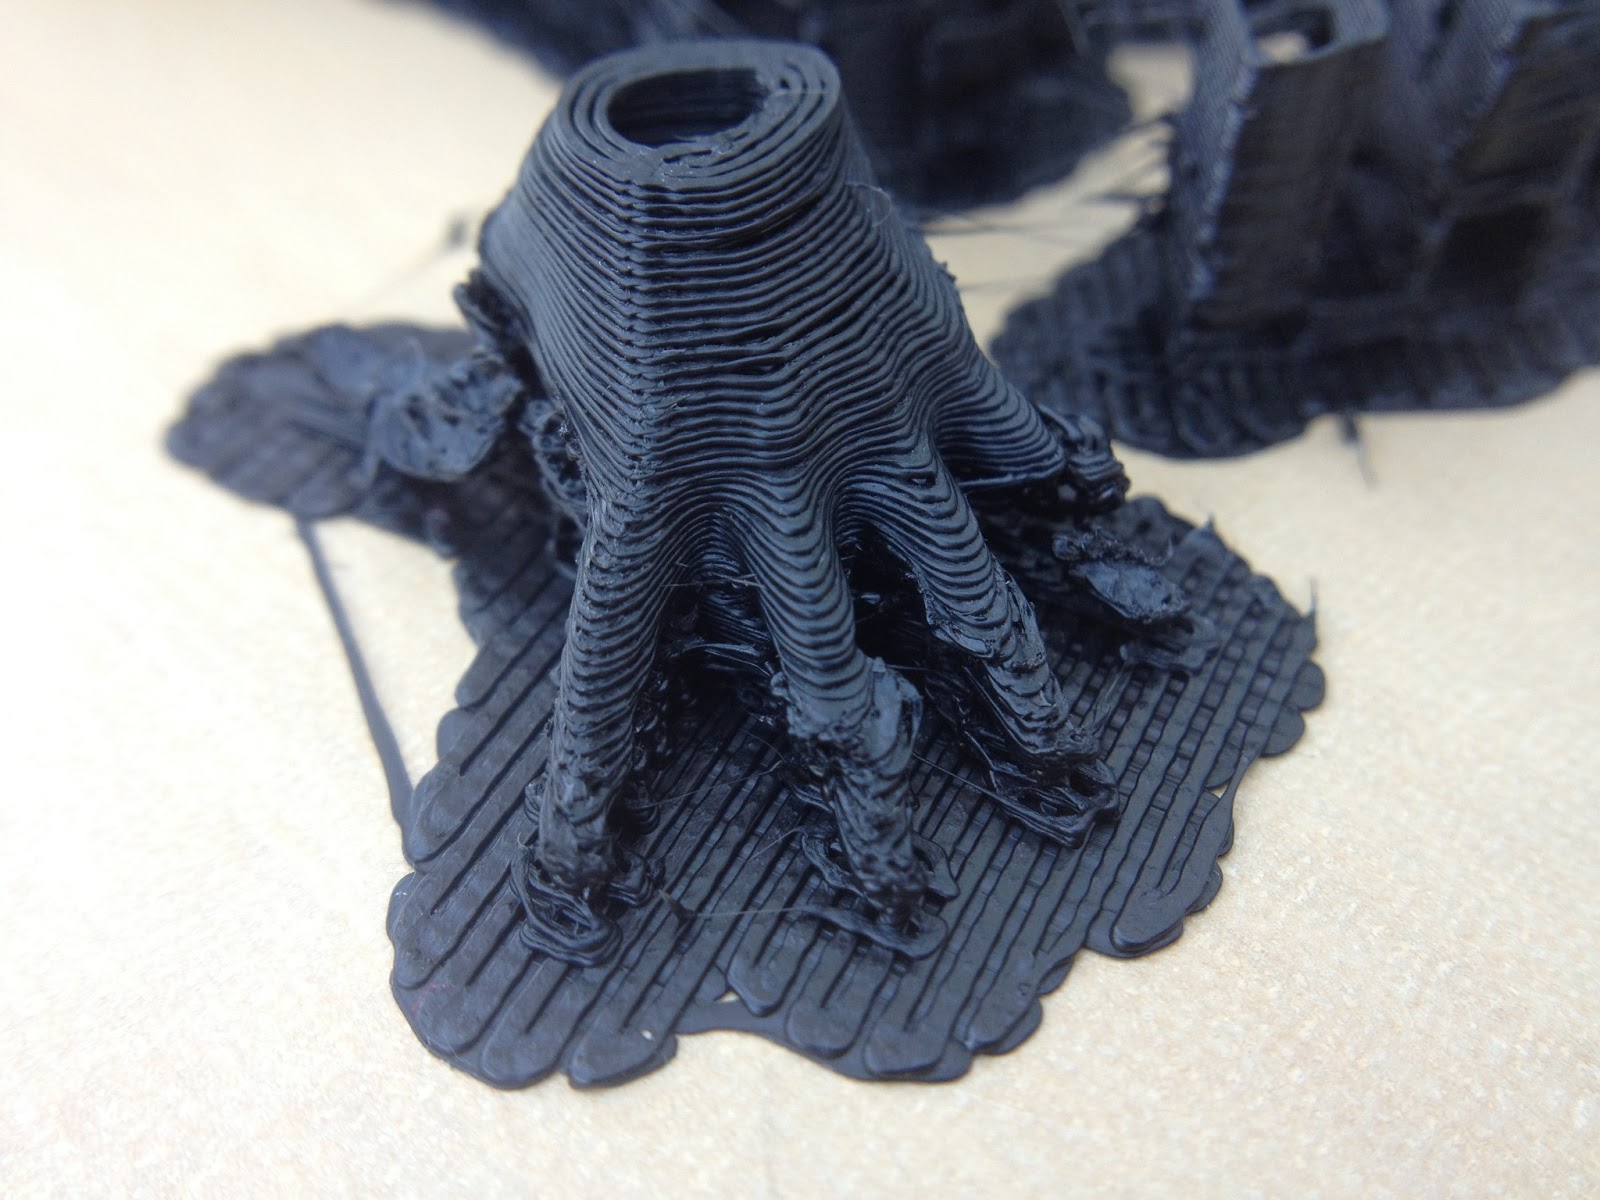
Straight from the printer, supports still attached.


Front view, reproducing the original pose.

Viewed from the back.


There are some nasty blemishes left behind where the supports were removed and I've also noticed that I'm getting more Z-banding on the models than I used to see. Maybe time to think about tuning up the printer again.

Tuesday 25 February 2014

Kayleigh

One of the most beautiful poses I've seen recently on Pinterest was this one.


It had been repinned many times, so clearly other people agreed with me, but wasn't being properly credited. I used Google image search to track down the original version and discovered that the model is Kayleigh Lush.


I used my favourite character modelling software to emulate the pose (not exactly right, but good enough to capture the spirit of the picture, I hope) and then exported an OBJ file. I then used Blender to correct the orientation and scale and to flatten the base and remove the eyelashes, before exporting an STL file.


Here is the screen capture of the 3D model in Blender.


This time I used Project Miller again to select the external surfaces of the model, then used Kisslicer to generate the gcode file with full support turned on and printed in white PLA from Faberdashery at 0.15 mm resolution. 

Another pretty successful print, in my view.


With hindsight, it might have been better to have sliced with Cura and used the expert setting called 'Fix Horrible' - type B, which closes all internal holes and deals much more nicely with limb overlaps. Maybe next time.

Monday 13 January 2014

Cicero D'Avila

I have continued in my efforts to make a good print of the sculpture inspired by the Cicero D'Avila pose in my previous post.


Firstly, I remade the arm pose, tipping the woman's head back to improve the angle of the face and prevent the arm support material from falling across it.


This smaller version was printed on a delta printer in red PLA and showed that the model was printable although the underside of the arms is still very ragged following removal of the support material.

At this point I decided to change the arm position again, opting for a more vertical configuration that would hopefully avoid the need for any support material. 


Once again I decided to shortcut the process of making the model printable by using Project Miller to re-skin the mesh. Unfortunately, the model still had some errors which resulted in malformed Gcode when I tried to slice it with Slic3r and Kisslicer. This time I found that the new version of Cura (I'm using 13.12) offered some very useful advanced options including Combine Everything (Type B) under the Expert settings. The Gcode looked very good in Repetier Host so I set off the 12 hour print and this time I finally managed to produce a model that does justice to the sculpture I had planned.

Here's a timelapse video made inside the printer using Octoprint.


Some detail shots taken before the smoothing process.


And after smoothing in acetone vapour to remove the print lines and support blemishes.


One more video of the finished product.


Sunday 9 June 2013

Bruno Birkhofer

Last year, Thingiverse member, richgain, demonstrated the use of a camera and a 3D printer to make copies of the works of great artists like Auguste Rodin when he published his version of Crouching Woman. The resolution is not great and his method of using point cloud renderings from multiple photos loses a lot of the fine details but the essence of the piece is still there in the lines that the body describes. 
This, to me, is the point of sculpture as art.


One of the artists I have recently discovered during my research is fashion photographer, Bruno Birkhofer. I share his passion for the artistic shapes and lines that can be described by the body held in a beautiful or unusual pose. He captures his models photographically and freezes the pose in time but also selects just one angle from which the model will be viewed. My attempts to convert these great photos into 3D models aim to allow these forms to be appreciated from any direction and angle.

Looking back over the work I have done so far allowed me to reflect that one of the pieces I most enjoyed creating was Metamorphosis. I still think it's a strikingly dramatic pose. So, when I saw this Bruno Birkhofer picture I immediately recognised an opportunity for a new sculpture.


I have started work on the pose and, although it still needs some refinement, I'm pleased with the way it's progressing. The next stage is to begin cleaning up the mesh to make it printable and finish working on the hair.


I decided to print the model at a higher resolution than I used for Recline and opted for a 0.15 mm layer height. The print came out very well with only the underside of the horizontal surfaces looking rather ragged. This should improve with the final smoothing in acetone vapour. 


Before smoothing


The finished sculpture

Tuesday 4 June 2013

Recline further

I decided to persevere with Recline and try to fix some of the problems.

Following an invitation from Sublime to try his calculator (see the comments in Recline), I learned that my setup could work better at 0.2 mm layer height if I increased the extrusion width from 0.4 to 0.48 mm. That should certainly help to improve layer bonding somewhat.

I also reasoned that the delamination in the first print had been caused by excessive part cooling with the fan. I know, I know. ABS isn't supposed to need a cooling fan but I still believe that with steep overhangs it just prints a bit better with one; I just had it turned up a bit too high.
The next problem to work on was the fingers. I started another couple of prints and both times the fingers failed again. Something different was going on here.


I thought about this for a long time and eventually came up with three ideas for possible solutions.
Firstly, the way that I had splayed the fingers out made the overhang angle more than 45 degrees. Changing the pose slightly to make the fingers more vertical should help.
Secondly, I had changed the support gap setting in Kisslicer from 0.5 mm to 1 mm to try and make it easier to break away; I suspected that this was actually making the support less supportive, so I put it back to 0.5 mm.

Finally, it dawned on me that the only thing supporting the fingers was the weak interface layer attaching them to the raft. This hadn't been a problem with Curl because there were relatively large areas attached to the raft but this print was quite literally clinging on by its fingertips, and in the end the lateral drag of hot plastic from the rapidly moving nozzle was proving too great for the weak bonds. The solution for this print was to abandon the raft and find a better way to get the fingertips to stick to the bed. 

One option I considered was to print the model on a plinth. This would provide the strongest and most reliable base but wasn't really in keeping with the rest of the series so I decided to keep it in reserve. 
Eventually I resorted to my favourite method which has worked well in the past. I went back into Blender, opened the model in point edit mode and used 'Box select' to highlight all the points in the bottom millimeter of the model and then used Scale Z 0 (zero) to flatten the bottom of the model and finally moved all the selected points up a little to the most natural position.
A liberal splash of ABS juice on the printbed and I was ready to have another go.

This time it went much better. No serious delamination at all and the fingers are looking much more solid. The left thumb appears to have shifted and reconnected at the base, but this should be relatively easy to repair.


Now I just need some time to do the support removal and acetone vapour bath.


Wednesday 22 May 2013

Recline

Here's my new project.  I've started a collection of potential sculptures on Pinterest and, having printed several curled up models, I fancied trying a more open, reclining pose like this one.  I have now discovered that this is one of the 'Square Nudes' series by Carsten Witte.


The amount of support material required should be fairly minimal although the steep angle under the upper back may need some.  Additionally, the palms of the hands are raised off the ground and will also need supporting. 
Another of the challenges will be to deal with the area where the thighs and calves will inevitably overlap after posing the model.

More to follow ...

Turns out that I still haven't quite got this 3D printing lark completely sussed yet. The modelling went quite well. I even broke with tradition and tried leaving the mouth open a bit to allow the front teeth to show. This, in turn, meant having to devise a different technique for closing off the open edges in the mouth area.


As usual, I opted to use Kisslicer to generate the gcode because I still find that it produces the best support material. The problems started when I began to print. In spite of the fact that I was using the same settings as I have for all my other prints (ABS at 240C, 0.2 mm layer height, 0.4 mm line width), the extrusion seemed thinner than usual and the inter-layer bonding was poor. The model finally appeared from the build chamber with several large cracks including a complete break in one of the arms.


The other major problem was that the fingers appeared to be poorly formed and looking as though they might come away with the support material. I haven't tried removing the support yet, due to lack of time, but I really don't hold out much hope for saving this print. 


One of the factors that has changed is my new hot end which has a 0.4 mm nozzle, whereas my previous one had a 0.5 mm diameter hole. Slic3r includes a place to enter the diameter of your nozzle but apparently Kisslicer does not.  I have never quite understood the logic of this, so I don't really know whether it could be a possible factor in explaining the latest failure.

I'll probably give it another try and maybe just turn up the flow rate a bit.

Sunday 5 May 2013

girl-6

You may remember that I found some interesting pictures on the CG Artists forum. One of the was called a painting by Edward McEvenue based a photo called girl-6 by buzillo.


I had a go at printing a model of her in the grey ABS which I had been using recently but was disappointed to see that the print was badly split in several places.


I have been reading about some people who have been experimenting with printing in a new nylon material called Taulman 618. One of the claimed advantages is its superior layer bonding with greater resistance to delaminating. I thought I would give it a try.


So, what are my first impressions of printing with nylon?
Positives:

  • No odour
  • Sticks well to blue painter's tape even on a cold bed
  • Nice smooth surface with a lovely sheen
  • No delamination at all
  • Much more flexible (less risk of breaking)

Negatives:

  • Support material is harder to remove
  • Strings are tricky to remove
  • No way of smoothing the surface yet
  • Much more flexible (less statue like, more bendy toy)

Will I be using it again?
Definitely!


Bridge printed

My test print of Bridge was successful at first sight, but on closer inspection the leotard had been only partially printed, particularly across the back where it was rather messy. In other places, it was a completely separate and rather fragile layer which started to come away as I removed the support material. So, in summary, my first faltering steps with printing clothing had been a bit of a failure. I decided to try and recover an otherwise good print by breaking away the remnants of the leotard.
A bit of scraping with a knife and an acetone vapour bath later, and I had another nice looking model.


Before removal of support material and leotard fragments