Saturday 20 September 2014

Changing direction

Time to take stock and think about some new ideas.

This blog has had over 40,000 views now. Does anyone ever read these notes or do people just come to look at the pictures? Many thanks to those few people who take the trouble to comment on my work.

I can't sell these prints so I just have to store them all. I'm not allowed to share the model files because of copyright restrictions on the base meshes. The owners are showing no signs of releasing the promised 3D printing license. I sincerely hope this changes soon. The only other solution is to keep working at sculpting until I can stop having to rely on character posing tools.

3D printing is slow and expensive, especially for some of the larger models, which can now take over 24 hours to print. It's easy to forget that 2 times the size equals 2x2x2 = 8 times the volume (and hence time and cost). I recently tried printing Casual Undress at half the normal size and was pleasantly surprised by two things. Firstly, the print was finished in under 3 hours, and secondly, it still had an amazing amount of visible detail. I would definitely try that again.


The one thing I am least happy with, at the moment, is the ugly scars left behind on the underside of parts which have been printed onto support material. I do my best to hide these in the photos I take, but if you look closely at some of the videos it is easy to spot these unsightly blemishes. I have some interesting ideas about how to try some experimental techniques to improve this.

Perhaps more fundamentally though, maybe it is time to move on and start working in a different area. I am happy to maintain this record of what I have achieved with some free software and a cheap home-made 3D printer, but I'm beginning to wonder what fresh challenges await ...

Wednesday 17 September 2014

Lush

This beautiful photo of Kayleigh Lush was one of the 100 photos taken by Ray Rapkerg and published on Twitter.


It's another interesting and challenging pose and also presents a great opportunity for me to practice sculpting hair.

The fingers of the right hand only make light fingertip contact with the ground which would present a problem during printing, so I have added a thin disc to anchor the hand firmly and take the weight of the right forearm.


Here is another angle which gives a better view of the hair.


The model printed well at the first attempt but needed plenty of support material under the face and breasts.


Here is a selection of views after removing the support material and ending with a video showing the model from all sides.


The next picture and the video were taken in full sunlight which brings out the amazing sheen in the printed plastic. It's called Christmas Green PLA from 3D Filaprint.


The obligatory full rotation view video.


Sunday 20 July 2014

Shame

I'm going to try and create a sculpture based on this picture next. I like the off-balance lines, the hidden face and the twisted shape.


The photo is by Tomas Rucker and is called 3 in his White series of nudes.

Here's the model I have created so far, viewed in Blender. The pose is clearly not identical but you can see where it takes its inspiration from.


When I came back to work on this pose I wasn't happy with it. The sinuous nature of the original pose had almost completely gone and the new hand position somehow changed the story. I decided to do some more work on the posing.


Then I thought it might be interesting to document the steps needed to make a posed model printable.

Hide the hair
Remove the eyelashes

Circle select eyes and mouth in side view

Shift-H hides everything else. Trim out the eyes and mouth and close up the holes in the mesh.

Hair models in character posing software are almost always totally unprintable items. I have found that the quickest way to make them printable is to use the ShrinkWrap modifier on a dense Isosphere placed in a position surrounding the hair model. Then using the project option in a negative direction, you can send all the points of the sphere inwards until they meet some point on the hair, leaving you with a single water-tight mesh. Some fairly intense smoothing removes all the jagged edges and leaves a very passable, and printable, copy of your chosen hair design. 


This just needs Boolean merging with the head which usually works OK, as long as the eyes and mouth have been fixed first. 

Now we need to deal with overlapping limb parts. There are several ways of doing this.
1. The quick and dirty method.
Use Autodesk's Project Miller to re-skin the visible external surface which hides any internal overlaps.
2. Use sculpt mode to flatten overlaps from the inside.
3. Use Boolean union to eliminate the overlaps. This option is interesting but doesn't work on a single mesh with overlapping parts. So why not just chop up the parts into separate meshes? Worth exploring, I think.

I started at the feet and worked upwards, using option 2 to eliminate any of the areas where the mesh of one limb poked through another. There is a typical example where the thighs cross. I used Box select to highlight all the affected vertices and then Shift-H to hide everything else.


From the inside you can see the bulge of the left thigh poking through into the inside of the right thigh, and vice versa.


I started by changing from Edit mode to Sculpt mode and then using first the Flatten brush and then the Smooth brush on the bulge to make it disappear. 


By working from both sides I could keep the contact area flat.


This works well where there is a small bulge across a large area, but is less effective where a larger, more complex part needs removing. So for the intersection of the arms and the left breast I decided to try a different tack and used option 3.

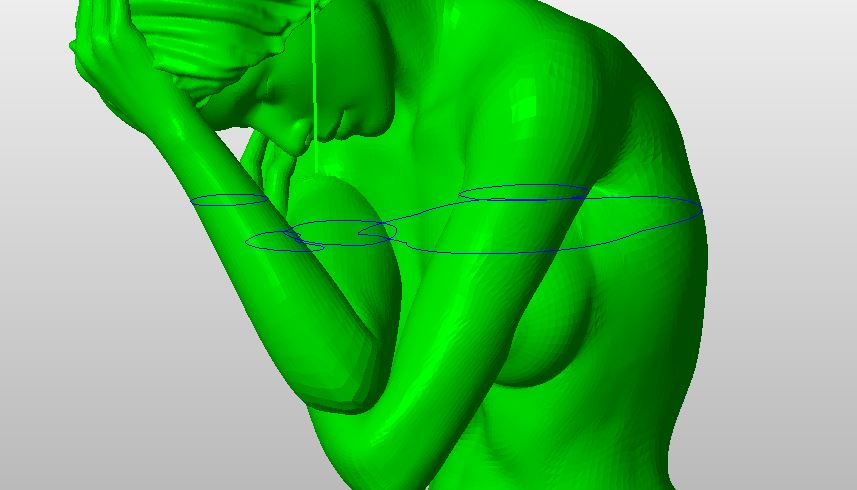
I rotated the model by 35 degrees around the vertical so that a horizontal plane would neatly bisect the upper arms. I then loaded the model into NetFabb which has a very nice plane cut function which provides a kind of X-ray preview of the slice before making the cut.


My cunning plan was to slice the model into a number of separate parts, make each one into a separate water-tight mesh and then Boolean merge them back together thus dealing with a number of complex overlaps at a stroke.


After making the cut, each half needed to be saved separately. The forearms, in the lower half, could then be selected and split off into a separate model. Here is the main torso piece.


My plan worked almost perfectly, only failing when the last piece in the sequence refused to Merge with the rest. I suspected that this was because the Boolean engine was struggling to cope with the intersecting parts and closing the loop of a torus and recognising the relative inside- and outside-ness of both ends at the same time. I fixed that by making another thin cut that took a slice out of the arms in an area with no complex intersections. Using that slice as the final merge then worked successfully. 

I added a simple bevelled cylinder to the base to make a stand. Eventually, I had reached the point where the only crossed meshes remaining were in both armpits. I spent a fairly lengthy mesh-editing session trying to clean up the mess but finally decided to take the easy way out and used Project Miller to re-skin the model for me. Don't know what I'd do without that bit of kit!

The main reason for going to all this trouble with the model was so that I could use Simplify3D as my slicer. Cura is better at handling faulty meshes but Simplify generates better support material that breaks cleanly away after printing.

I had intended to print this model on my tall delta printer, but it isn't coping well with this hot weather and the motors seem to be prone to skipping steps. So I went back to the Mendel90 and printed a small test version.

3D printed version in coffee-brown PLA before and after removing the support material.


Just like Pensive, one of my earliest works, the fingers are only slight wider than the extruded filament at this scale. It really needs to be printed twice as big as this. As soon as the cooler weather returns I'll try again on the delta printer.

Tuesday 24 June 2014

Brenda Lynn


This photo of Brenda Lynn Acevedo, found on the Bella Donna blog, caught my eye for a couple reasons. Firstly, having her arms (and, in my imagination her legs) held either flat or vertically makes them easy to print without support; and then of course there is the way that her breasts gently rest on the floor giving them a profile that reminds me of a Piet Hein superegg (go and look it up and you'll see what I mean).


The fluid nature of (natural) breast tissue means that it naturally reshapes itself in response to gravity. (Of course, the same is true of all fatty tissue, but the models in these photos don't usually have much surplus fat in other places, so this issue generally only affects the breasts.) Character modelling software allows you to position the limbs, trunk and head in anatomically plausible positions, but also allows you to change the shape, size and position of the breasts. One thing that it doesn't do very well though is to model the impact of gravity on mobile breast tissue; there are add-on pieces of morphing software that give an additional level of control, but nothing I have found yet that mimics the effect of gravity on natural breasts in a reclining position.
So, after exporting the best pose I could manage from the posing software, I started sculpting in Blender until the breasts had a shape I was happier with and which I was ready to try printing. 


Feeling lazy, I used the clock rewind trick to bring Project Miller back to life again and quickly generated a single watertight mesh from the multi-object base and then did one more smoothing iteration.
I used Simplify3D for the slicing and made sure there was plenty of support material around the right arm so that the small point of elbow contact with the bed wasn't put at risk of failure.
I decided to use a nice wood-coloured PLA from 3D Filaprint and after a long 16 hour print this is what the printer produced.


Opinion: I'm generally very pleased with this one. There are couple of areas that could be improved - some distortion around the heel, and rather too little support material in the small of the back and between the shoulder blades.

Postscript: I decided to adjust the layer positions and try a reprint. This one came out even better.


Sunday 8 June 2014

Yoga interrupted

My third and final sculpture this week is a mashup of two more photos I found on Belladonna's Tumblr blog. I wanted to use the top half of this photo ...


... and the bottom half of this painting by Giuseppe Gigli ...


... combined in a single pose.


Getting the feet into position was the most difficult part.


I am already a total convert to the idea of 'micro-layering - printing the external skin at 0.1 mm layer height but the support and infill at 0.3 mm layer height, so infill is only laid down every third layer. One of the new features I have been experimenting with is 'infill zoning'.
  • Starting at the bottom, Zone 1 uses 25% infill.
  • The top surfaces of the calves, thighs and feet are in Zone 2 and use 40% infill.
  • The trunk, arms and head in Zone 3 revert to 25% infill.
  • The top of the head uses 50% infill.

You can just about see the four zones in this reverse cross-section view (click to enlarge).


This uses less infill material where it is not needed, saving time and money, but increases the level of internal support where important top surfaces need to be laid down smoothly. 


The support material generated by Simplify3D worked reasonably well but left the undersides of the elbows and calves a little rougher than I would have liked.

Saturday 31 May 2014

Leaning back

The second new print was inspired by one of the many great pictures I came across in Bella Donna's Tumblr blog. I should warn you that it is NSFW, but it is a beautifully curated collection.


This is one one of many archive photos and sadly there are no details of the photographer. Performing a Google image search didn't help me on this occasion.

There are many invisible details that I have had to use my imagination for, such as the position of the feet in relation to the head and the expression on the model's face. It was a great challenge though and resulted in a nicely printable model.

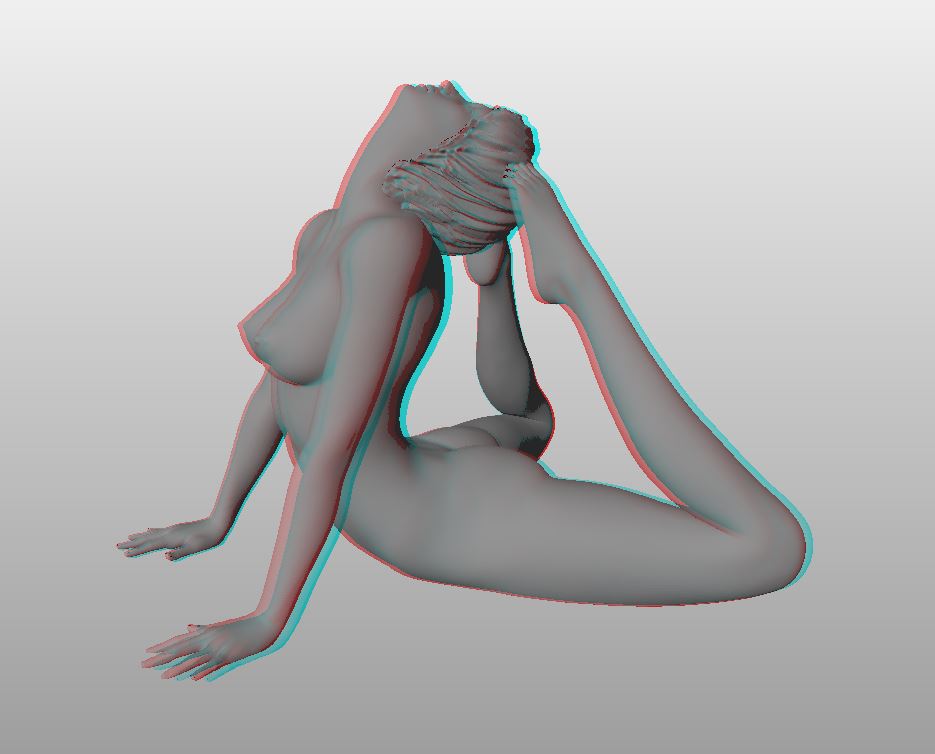
Here's a side view of my digital version in red-cyan anaglyph mode (which I've just discovered you can do in NetFabb!). Dig out those glasses and have a preview.


This model just happens to be close to the exact proportions of my printer's printable volume, so this could turn out to be one of my largest models yet. At a layer height of 0.1 mm and a total print height of 125 mm this is going to take 18 hours to print. Keeping everything crossed for this one!

OK, printing successfully finished and here she is (iPhone included for scale).


Reflections

Here is the first of three new prints I have been working on recently.


'Reflections' came to my attention when Bruno Birkhofer posted a different picture on Google+ last week. All his pictures are beautiful but, once again, it was one of his black and white portraits that inspired me to try another sculpture.

Modelling the pose in my favourite character modelling program was fun, as usual, but it proved particularly tricky to place the hands in exactly the right position. Several of the joint movement ranges have to have their range limitations turned off just to get close. 

In a moment of over-zealous optimism I decided to replicate the model's facial expression and kept the eyes closed but the mouth open. This involved a significant amount of cleaning up in Blender for a detail that ultimately proved too small to show in the final print. 


Not to worry - one day I may be able to sell these models and perhaps I'll even be able to afford a nice high-resolution DLP printer like the Kudo3D and then they will look even better.

I'm now getting the hang of using Simplify3D to slice my models so that the support material is placed where it's needed. The only thing I got wrong this time was placing insufficient support underneath the ponytail. The tip broke free during printing but fortunately the print managed to correct itself leaving enough to look reasonably OK.

Here's a couple of photos of the final print using translucent coffee-coloured PLA from 3D Filaprint, at 0.1 mm layer resolution with support enabled.

Close-up reproducing the pose in Reflections


The full model, showing a nice reflection of its own