Sunday 6 January 2019

Shape and Form

A recent tweet from Rebecca Tun, who was the subject of one of my previous models, led me to the website of Max Operandi.   One of the Sensual photos I found there inspired me to create my next piece. It was this one called ‘Shape and Form’ (nice title!) which looked like an interesting challenge.


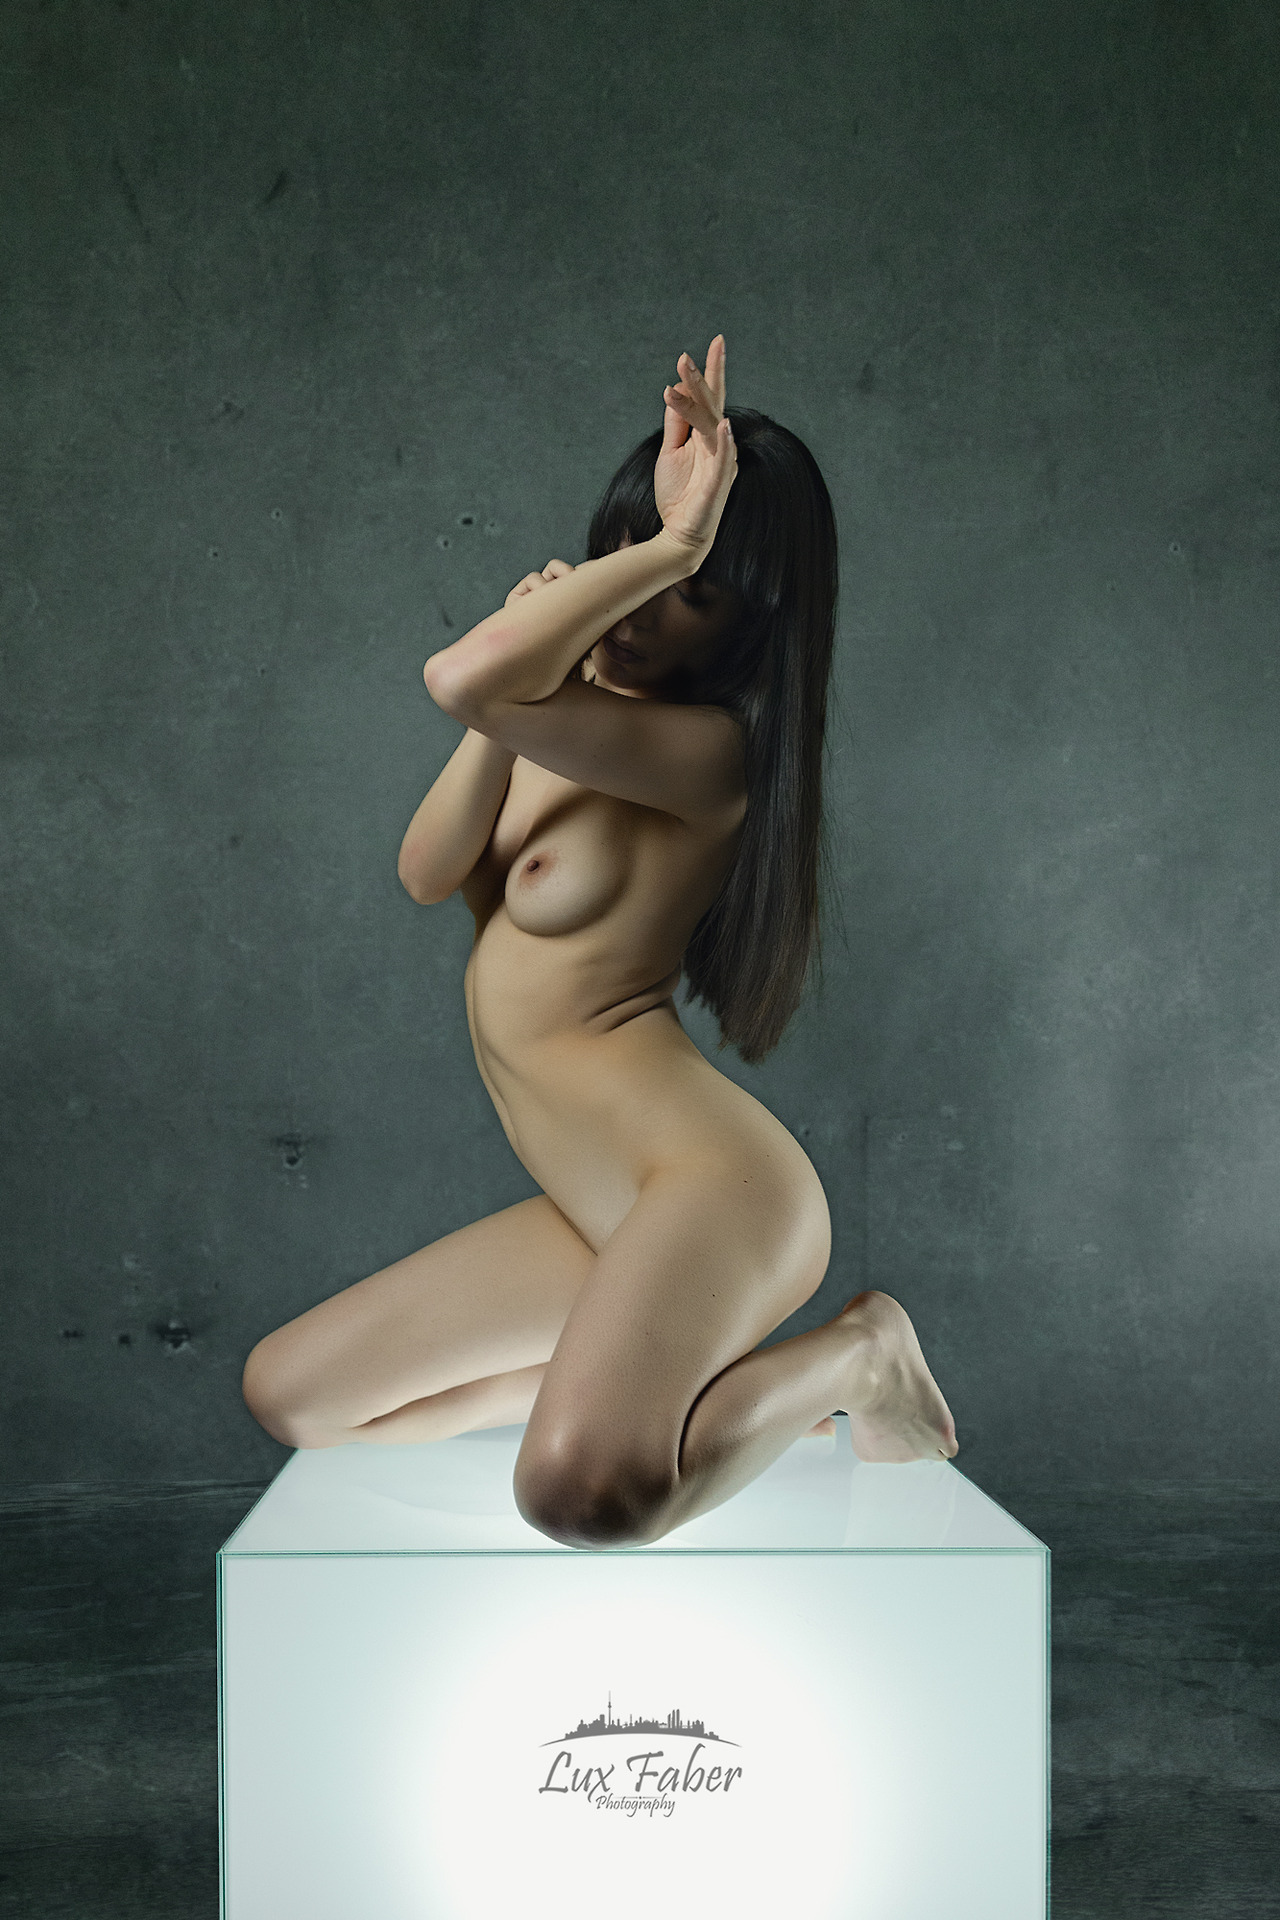
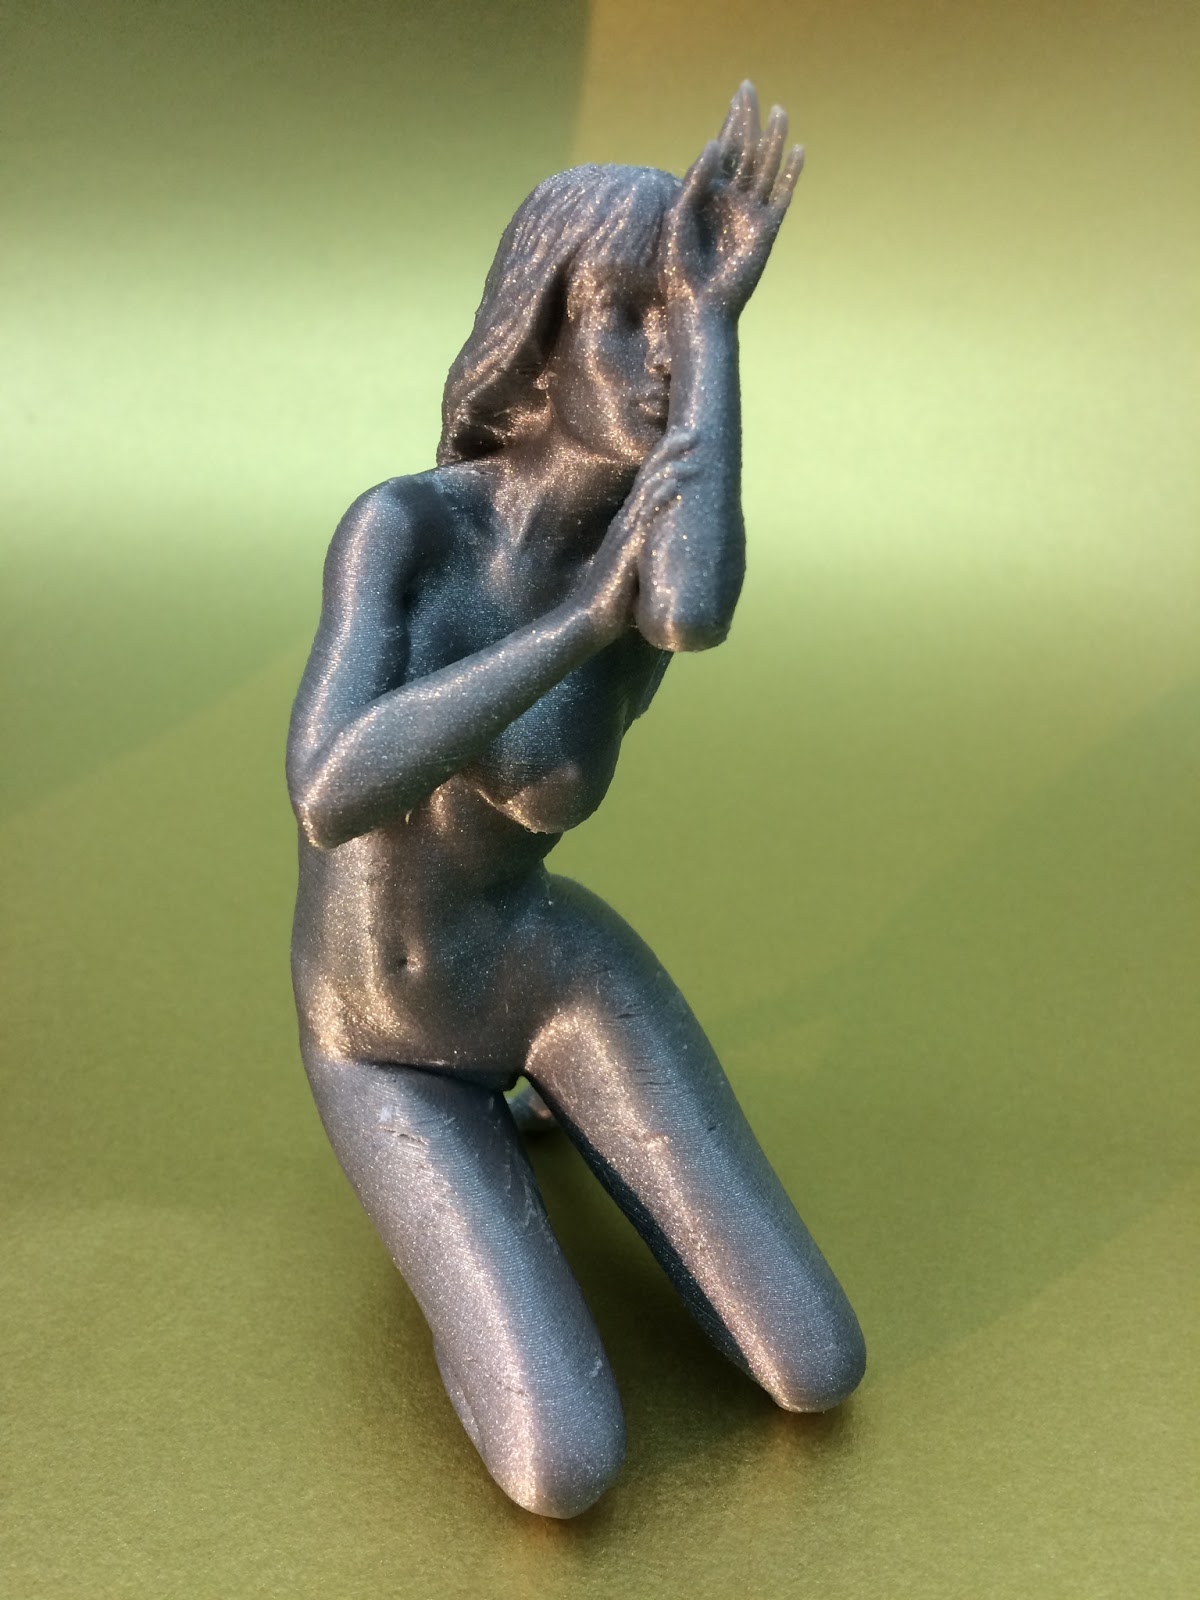
As always, the challenge was to use the pose controls in Daz Studio to copy the essence of this pose as accurately and artistically as possible and then create a printable 3D model.


Starting from Daz 3D Studio's Genesis 8 female as a base, I began by observing that model’s pelvis was rotated about the Y axis with the right hip flexed and internally rotated, whilst the left hip was extended sideways and backwards. I kept checking the position of the bent limbs in relation to the X-Y plane so that everything would end up making good contact with the floor.
Both arms had to be extended backwards, the left arm position being rather left to guesswork and imagination. I copied the extended fingers and bridging of the right hand and mirrored this position in the left hand.


With the exception of the horizontal area under the left inner thigh, the 3D model needed little or no support material. Keeping the breasts smaller and the head tipped upwards also removed the need for support material under the nose or chin. The hair was copied from the Katherine hair style and then sculpted in Blender as usual.

She printed beautifully, first time, in Fillamentum Vertigo Grey.

Many thanks to MaxO for giving me permission to share his photo here.


Saturday 9 June 2018

Reflections

I started working on this sculpture a few years ago but I wasn't happy with my first attempt so I put the project on hold. It all began when I saw online (I can't remember where) a picture of a small statuette called 'Reflections' by a 20th century sculptor called Harriet Whitney Frishmuth (she hated being called a sculptress!) 


She studied under Rodin before moving to America and doing most of her work there. Some of her larger works are on display in museums across the USA, including the Met in New York, but she also produced smaller pieces such as this one which regularly come up for sale in art auctions and can fetch hundreds of thousands of dollars. I think I would rather make my own copy! 


Most of the time, I have to work from a single photo when posing the model in Daz 3D, but in this case I managed to find another site with an auction catalogue that contained photos of a different copy of Reflections (sculptors often made iterative changes to their best-selling works). In this case, the statue had been photographed from every angle. 

Reflections looked like a great challenge because the pose can be made virtually support-free. I used the Victoria 6 HD female Genesis 2 base model in Daz Studio 4 and began the process of painstakingly moving each joint into the perfect position to capture the pose as accurately as possible. 


I had to position the fingers very carefully, ensuring that the tip of each finger pressed slightly into the skin it was resting upon. Details like this help the model to print successfully without needing to add support.

I have been experimenting with a new technique to get the eyes to print better. This involves carefully deleting the outer layer of the eyeball which represents the cornea. The layer underneath (the iris) has a central depression, but not a full hole, which acts as the pupil. This needs enlarging a little to make it show up in the model but the effect is well worth the effort.

I decided to model the hair myself in Blender’s Sculpt mode, which I am beginning to get the hang of using. I wanted a full-bodied style resting easily on the shoulders.

Having completed the sculpting and manipulation work in Blender, I used Project Miller to shrink-wrap a new high-definition mesh around the model to deal with all the self-intersections where the fingertips touch the thighs. A little more cleaning up to fix the normals and adding a base for her to stand on gave me a printable model.

I printed a full sized copy first on my E3D BigBox which has Independent Dual Extrusion on X carriage (IDEX) so that I could use PolySupport break-away material for the few remaining places that needed it, mainly under the nose and some folds of hair.
 
  
The print started out very well but the higher it got, the more the model started to wobble with each pass of the printhead. I resorted to using hot glue and chopsticks as described  in this video and managed to rescue the model albeit with some artifacts that you can see in the face and hair.

I decided to do some more printing to do this beautiful model justice and hit upon the idea of rotating her backwards 45 degrees and printing only the top half. The main benefit of doing this was to remove the need for any support material at all. This in turn meant that I could switch to using my new Creality CR-10S printer combined with some fabulous Fillamentum Vertigo Grey filament.


I'll let the results speak for themselves.


Tuesday 10 October 2017

Rebecca

I said I would post a new model design when I reached 100,000 views for the blog and it's happened, so here we are.

As promised, I took my inspiration from an intriguing pose posted on Rebecca Tun's blog.


Plenty of challenges here for getting the pose right and then printing a decent model. I used the Daz 3D Genesis 3 base model and a pretty long hair style to try and match the photo.


I used my standard techniques for shrink-wrapping the hair in Blender to make a watertight solid model and then, combining the meshes in Project Miller (still one of the best tools for this job, in my view).

Over the last year I have been upgrading my printer to have dual extrusion capability and just recently I have successfully configured the two extruders to work fully independently of each other.

I used Rapunzel Silver PLA from Fillamentum in one extruder, and PolySupport from Polymaker in the other. This combination provides great support with no gaps but then breaks cleanly away once the model is cool. This results in some of the highest quality I have ever achieved. See for yourself!


Saturday 25 June 2016

80,000 views

In celebration of reaching 80,000 page views, here is a brand new sculpture I created to print on my new 3D printer. I started from this photo found on Pinterest. Unfortunately, I haven't been able to identify the model or the photographer. If anyone has any information, please let me know.


I use Daz Studio 4.9 to create a pose using the Olympia 7 model and Sally G3 hair. Here is the model in the Daz Studio interface.


After exporting the model from Daz Studio I used Project Miller to reskin the model and Blender to shrink-wrap the hair. I did a considerable amount of work using the sculpt tools in Blender to improve the look and shape of the hair whilst keeping it as printable as possible. Here is a screen grab of the final STL file.


I recently upgraded to a BigBox3D from E3Donline and here is the model printed using grey Edge filament.


A nice addition to the collection!

Tuesday 5 May 2015

Not size zero

So, Daz 3D have finally seen the light and changed their EULA to allow 3D printing of their models, but only for non-commercial use. It is a relief to be able to use the software and models legally now, but I still can't share any of the meshes or sell the models that I create.

As you will know, if you have read any of my previous posts, I enjoy the challenge of trying to create beautiful sculptures by posing a 3D model to match either an existing photograph or an image that I have in mind. One of the aspects I have spent less time on is adjusting the shape of the woman's body. I received a comment from a reader asking whether I ever sculpted larger women and I had to admit that I hadn't tried yet, so this time I thought I would deviate from the default, skinny model body shape and try creating a woman who looks more typically average in body size.

I used the Victoria 6 body with the HD mesh add-on, which has more natural curves around the joints. I began with an idea for a pose in a fairly relaxed style and then played around with all the different character shape parameters , giving a modest 20% increase to the 'Heavy' setting and a 70% boost to the 'Weight' parameter. I'm not entirely sure what the difference is but it's quite an interactive process, so I just move the sliders slowly and stop when I see the effect I'm looking for.


Daz haven't just given permission for 3D printing of their models, they've simplified the whole process too. Upgrading to the latest version of the Genesis 2 models brings a new option to the Anatomy section.


This rather gruesome-looking add-on modifies the geometry of the eyes and mouth, turning them into closed meshes. It also replaces the front of the eye with a new, more sculptural representation of the iris and pupil.

I chose an elegant, raised hairstyle that still required my previously-described shrink-wrap technique to make a fully printable model.

The pose would clearly need support material turned on in several areas, as can be seen in the print below.


This is quite a small print, taking five and a half hours to print at 0.1 mm resolution. There are still some small blemishes left after removal of the support material, particularly on the underside of the model. There are also signs of irregularity in the Z-direction which need further investigation.


Overall, a very satisfying project.


Wednesday 21 January 2015

Tyce

Well, I said I would start a new model when I hit the 50,000 views mark and it's happened. I was inspired by this photo of Eléa Joly by Antoine Tyce and so created a pose closely based on the original. 


The really big news this time is that HiveWire3D have released a new version of their Dawn model which has far better handling of extreme joint positions. And best of all, Dawn SR2 is fully licensed for 3D printing (non-commercial, personal use without an additional license). This means that I can now legally use my own 3D printers to print posed models.

The enjoyable part for me is working out how to pose the model in a realistic, but still printable, way, that looks both interesting and unusual but still natural and anatomically correct. I chose to move the left hand downwards to make printing easier and to allow me to scale the model up a bit larger inside the printable volume of my largest printer. Placing the left hand on the right thigh seemed natural and ensured a printable outcome. 

Making the resulting meshes printable is now just a minor chore that usually takes less than an hour to complete. Simplify 3D does a great job of generating just the right amount of support material so that the undersides of surfaces are printed as cleanly as possible. I still like to print at 0.1 mm resolution so that as much of the detail is preserved as possible. The print ran for 30 hours without a hitch and looks great.

Here are some photos and a video of the print before and after the support material was removed. I have lightly sanded the undersides in preparation for my first attempt at painting a model.


And now here is the model painted.
I used a matte black spray paint as an undercoat and then used a dry brushing technique to apply a metallic bronze acrylic paint.


Saturday 20 September 2014

Changing direction

Time to take stock and think about some new ideas.

This blog has had over 40,000 views now. Does anyone ever read these notes or do people just come to look at the pictures? Many thanks to those few people who take the trouble to comment on my work.

I can't sell these prints so I just have to store them all. I'm not allowed to share the model files because of copyright restrictions on the base meshes. The owners are showing no signs of releasing the promised 3D printing license. I sincerely hope this changes soon. The only other solution is to keep working at sculpting until I can stop having to rely on character posing tools.

3D printing is slow and expensive, especially for some of the larger models, which can now take over 24 hours to print. It's easy to forget that 2 times the size equals 2x2x2 = 8 times the volume (and hence time and cost). I recently tried printing Casual Undress at half the normal size and was pleasantly surprised by two things. Firstly, the print was finished in under 3 hours, and secondly, it still had an amazing amount of visible detail. I would definitely try that again.


The one thing I am least happy with, at the moment, is the ugly scars left behind on the underside of parts which have been printed onto support material. I do my best to hide these in the photos I take, but if you look closely at some of the videos it is easy to spot these unsightly blemishes. I have some interesting ideas about how to try some experimental techniques to improve this.

Perhaps more fundamentally though, maybe it is time to move on and start working in a different area. I am happy to maintain this record of what I have achieved with some free software and a cheap home-made 3D printer, but I'm beginning to wonder what fresh challenges await ...